
Ratchet & Clank: Rift Apart is an action-packed, visually stunning game that has captivated gamers around the world. However, like any other PC game, it is not immune to technical issues. Some PC users have reported facing problems such as the game not launching, crashing, freezing, or displaying a black screen. These issues can be frustrating and prevent players from enjoying the game. In this guide, we will explore step-by-step solutions to troubleshoot and resolve these common problems so that you can get back to adventuring in the dynamic world of Ratchet & Clank: Rift Apart.
How to Fix Ratchet & Clank Rift Apart Not Launching, Crashing, Freezing & Black Screen Issue On PC
1. Check System Requirements and Compatibility
- Check the Ratchet & Clank: Rift Apart minimum and recommended system requirements below and make sure your PC meets the minimum requirements.
- Compare your PC’s specifications with the game’s requirements to ensure compatibility.
- Upgrade your hardware if necessary to meet the minimum requirements.
| MINIMUM | RECOMMENDED | |
|---|---|---|
| OS | Windows 10 (version 1909 or higher) | Windows 10 (version 1909 or higher) |
| Processor | Intel Core i3-8100 or AMD Ryzen 3 3100 | Intel Core i5-8400 or AMD Ryzen 5 3600 |
| Memory | 8 GB RAM | 16 GB RAM |
| Graphics | NVIDIA GeForce GTX 960 or AMD Radeon RX 470 | NVIDIA GeForce RTX 2060 or AMD Radeon RX 5700 |
| Storage | 75 GB available space | 75 GB available space |
| Additional | SSD Recommended | SSD Required |
2. Update Graphics Drivers
- Identify your GPU manufacturer (NVIDIA, AMD, or Intel).
- Visit the manufacturer’s website.
- Download the latest graphics drivers compatible with your GPU model.
- Install the drivers and restart your PC.
Download NVIDIA Driver: https://www.nvidia.com/en-us/geforce/drivers/
Download AMD Driver: https://www.amd.com/en/support
Download Intel Driver: https://www.intel.com/content/www/us/en/download-center/home.html
3. Verify Game Files
- Launch the gaming platform (Steam, Epic Games, etc.) where you have Ratchet & Clank: Rift Apart installed.
- Locate the game in your library and right-click on it.
- Choose “Properties” or “Manage.”
- Look for an option to “Verify Integrity of Game Files” or similar.
- Let the verification process complete, and any corrupted files will be repaired.
4. Disable Overclocking
- Access your PC’s BIOS settings during the boot process (usually by pressing a specific key like F2 or Del).
- Navigate to the “Overclocking” or “Advanced” section.
- Set CPU and GPU clock speeds to their default values.
- Save the changes and exit the BIOS.
5. Adjust Graphics Settings
- Launch Ratchet & Clank: Rift Apart.
- Access the in-game graphics settings or options menu.
- Lower the graphics quality settings (e.g., resolution, texture quality, shadows, etc.).
- Apply the changes and restart the game.
6. Run the Game as Administrator
- Close the game if it’s running.
- Find the game’s executable file (usually located in the installation directory).
- Right-click on the executable.
- Select “Run as administrator” from the context menu.
- Confirm the action and launch the game.
7. Disable Antivirus and Firewall
- Temporarily turn off your antivirus and firewall protection.
- Launch Ratchet & Clank: Rift Apart to check if the issue is resolved.
- If the problem is fixed, consider adding the game to your antivirus and firewall exceptions.
Here are the steps to do so:
Adding the Game to Antivirus Exceptions:
- Open your antivirus software: Locate the antivirus program on your PC and open its main interface.
- Access the settings or options: Look for a “Settings,” “Preferences,” or “Options” menu within the antivirus software.
- Navigate to the exclusions or exceptions section: In the settings menu, find a section related to exclusions, exceptions, or trusted applications.
- Add the game executable to the exceptions list: Click on “Add” or “Add an exception” and browse to the location where the game’s executable file is located. Typically, it will be in the installation directory, under “Program Files” or “Program Files (x86),” in a folder named after the game.
- Select the game executable: Choose the game’s executable file (it usually has a “.exe” extension), and add it to the exceptions list.
- Save the changes: Confirm the addition and save the changes you made in the antivirus settings.
Adding the Game to Firewall Exceptions:
- Access Windows Defender Firewall settings: Press the Windows key + I to open the Windows Settings app. Then, go to “Update & Security” > “Windows Security” > “Firewall & network protection.”
- Click on “Allow an app through firewall”: Under “Windows Defender Firewall,” click on “Allow an app through firewall” or “Allow an app or feature through Windows Defender Firewall.”
- Click “Change settings” (if necessary): If the option is grayed out, you might need administrative privileges. Click “Change settings” and enter your administrator password if prompted.
- Add the game to the allowed apps list: Click on “Allow another app” or “Add an app,” then click “Browse” and navigate to the game’s executable file (usually in the installation directory, under “Program Files” or “Program Files (x86)“).
- Select the game executable: Choose the game’s executable file (it usually has a “.exe” extension), and click “Add.”
- Choose network types: After adding the game, you’ll see a list of network types (private or public). Choose the appropriate network types for which you want to allow the game’s network access.
- Save the changes: Click “OK” or “Add” to save the changes and add the game to the firewall exceptions.
By adding the game to your antivirus and firewall exceptions, you allow it to run without unnecessary interference from these security measures. This can help prevent issues with game performance, launching, and connectivity caused by overprotective security settings.
8. Install Windows Updates
- Open the Windows Settings app (Windows key + I).
- Go to “Update & Security.”
- Click on “Check for updates.”
- Download and install any pending updates for your operating system.
9. Check for Background Applications
- Press Ctrl + Shift + Esc to open the Task Manager.
- Identify resource-intensive background applications and processes.
- Right-click on each unnecessary process and select “End Task.”
10. Update DirectX and Visual C++ Redistributables
- Download the latest DirectX version from the official Microsoft website.
- Install the Visual C++ Redistributables provided by Microsoft.
11. Reinstall the Game
- Uninstall Ratchet & Clank: Rift Apart from your PC.
- Re-download the game from your gaming platform’s library.
- Install the game again and check for improvements.
12. Run a System File Check
- Open the Command Prompt as an administrator (search for “Command Prompt,” right-click, and choose “Run as administrator“).
- Type “sfc /scannow” and press Enter.
- Let the system scan and repair any corrupted files.
13. Monitor Temperature and Hardware Health
- Install hardware monitoring software (e.g., HWMonitor, MSI Afterburner).
- Monitor CPU and GPU temperatures during gameplay.
- Ensure that fans and cooling systems are working correctly.
14. Try adding -dx11 or -dx12 in launch options
Using the “-dx11” or “-dx12” launch options can help you specify the DirectX version that a game should use when launching. Here are the steps to add these options:
- Find the game’s executable file (usually with a “.exe” extension).
- Right-click on the game’s shortcut or executable.
- Select “Properties” from the context menu.
- In the properties window, go to the “Shortcut” tab.
- In the “Target” field, you will see the path to the game’s executable file. After the file path, add a space and then either “-dx11” or “-dx12” without the quotation marks.
- If you want to use DirectX 11, add:
-dx11 - If you want to use DirectX 12, add:
-dx12
- If you want to use DirectX 11, add:
- Click “Apply” and then “OK” to save the changes.
- Now, whenever you launch the game using that shortcut or executable, it will use the specified DirectX version according to the added launch option.
Keep in mind that not all games support both DirectX 11 and DirectX 12. Some games may only support one of these versions, so make sure to check the game’s documentation or official website for compatibility information.
15. Turn off “nvidia reflex low latency”, turn off Ray Tracing & DLSS, Set texture quality to medium
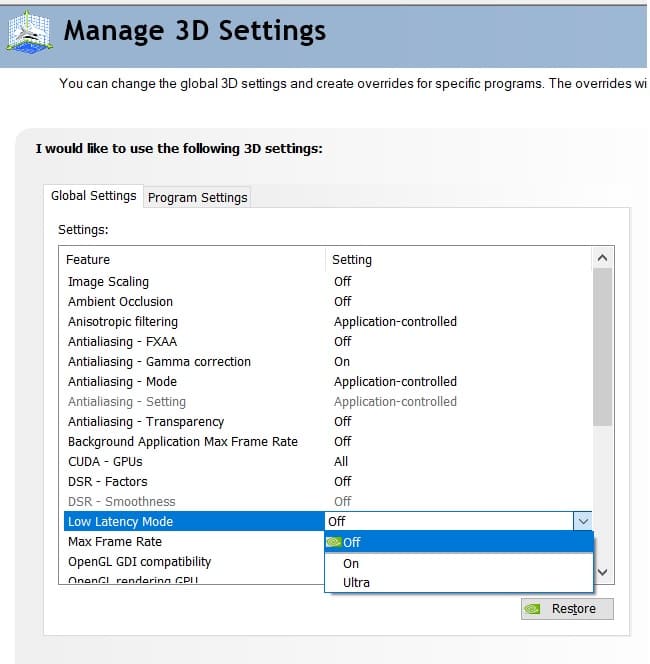
Turn Off “NVIDIA Reflex Low Latency”:
- Right-click on your desktop and select “NVIDIA Control Panel” from the context menu.
- In the NVIDIA Control Panel, click on “Manage 3D settings” in the left-hand pane.
- In the “Manage 3D settings” window, go to the “Global Settings” tab.
- Scroll down in the settings list and locate “NVIDIA Reflex Low Latency.”
- Change the option to “Off” to disable NVIDIA Reflex Low Latency.
- Click the “Apply” button at the bottom right corner to save the changes.
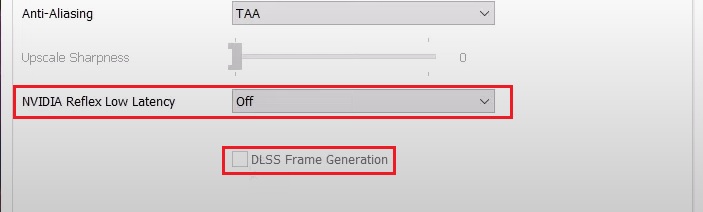
You can also turn off the NVIDIA Reflex Low Latency from the in game’s setting options. On the launch screen click on Settings > Display > NVIDIA Reflex Low Latency > Set this to Off. Also, just below that, you will also find the option find the option to to enable or desable DLSS Frame Generation, remove the tick and save the settings.
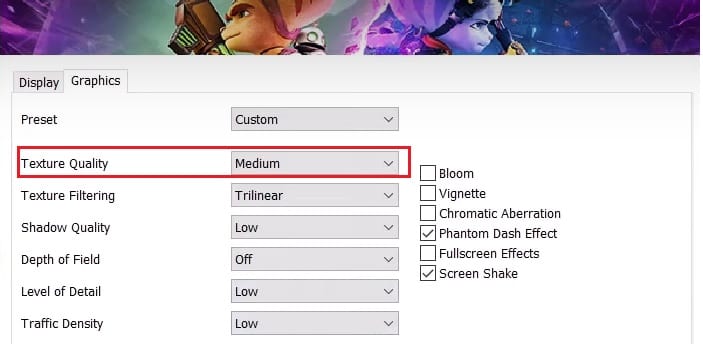
Set Texture Quality to Medium:
- If you haven’t already, launch the game and access the in-game graphics settings.
- Find the setting for “Texture Quality” in the graphics options.
- Change the “Texture Quality” setting to “Medium.”
- Save the settings by applying the changes.
After following these steps, “NVIDIA Reflex Low Latency” will be turned off, Ray Tracing, and DLSS will be disabled, and the texture quality will be set to medium.
16. Seek Help from the Gaming Community
- Visit official game forums or community discussion boards.
- Describe your issue and ask for assistance.
- Other players or support staff may provide valuable solutions.
Conclusion
By following these step-by-step solutions, you can troubleshoot and resolve common issues with Ratchet & Clank: Rift Apart on your PC. Ensure your system meets the game’s requirements, keep your graphics drivers updated, and try various settings to find the optimal performance. If all else fails, seek help from the gaming community or the official support channels. Now, nothing should hold you back from enjoying the thrilling adventures in Ratchet & Clank: Rift Apart!
FAQs
- Why is Ratchet & Clank: Rift Apart not launching on my PC? There could be various reasons, including outdated drivers, compatibility issues, or background applications. Follow the guide in this article to troubleshoot the problem.
- How do I update my graphics drivers? Visit the website of your graphics card manufacturer (NVIDIA, AMD, or Intel) and download the latest drivers for your GPU model.
- Will lowering graphics settings affect the gameplay experience? Lowering graphics settings may sacrifice some visual quality, but it can significantly improve performance and resolve crashing and freezing issues.
- Can I run Ratchet & Clank: Rift Apart on an older PC? Check the game’s official system requirements to determine if your PC meets the minimum specifications. Older PCs may struggle to run the game smoothly.
- Where can I seek further help if I can’t resolve the issue? If you have exhausted all the troubleshooting steps, seek assistance from the gaming community forums or the official game support channels for personalized help.